Sunday, 17 May 2015

My Current Gym Routine

You may have read my recent blog post about how I set myself the challenge of getting myself back into shape.. *looks over at the Dominos menu pinned to the fridge longingly*.

I'll be honest & say that I haven't suddenly turned into some fitness fanatic who's ready to run the London Marathon.. but there's something about dragging myself to the gym that ultimately leaves feeling pretty good about myself.. Endorphins maybe? Who knows. 

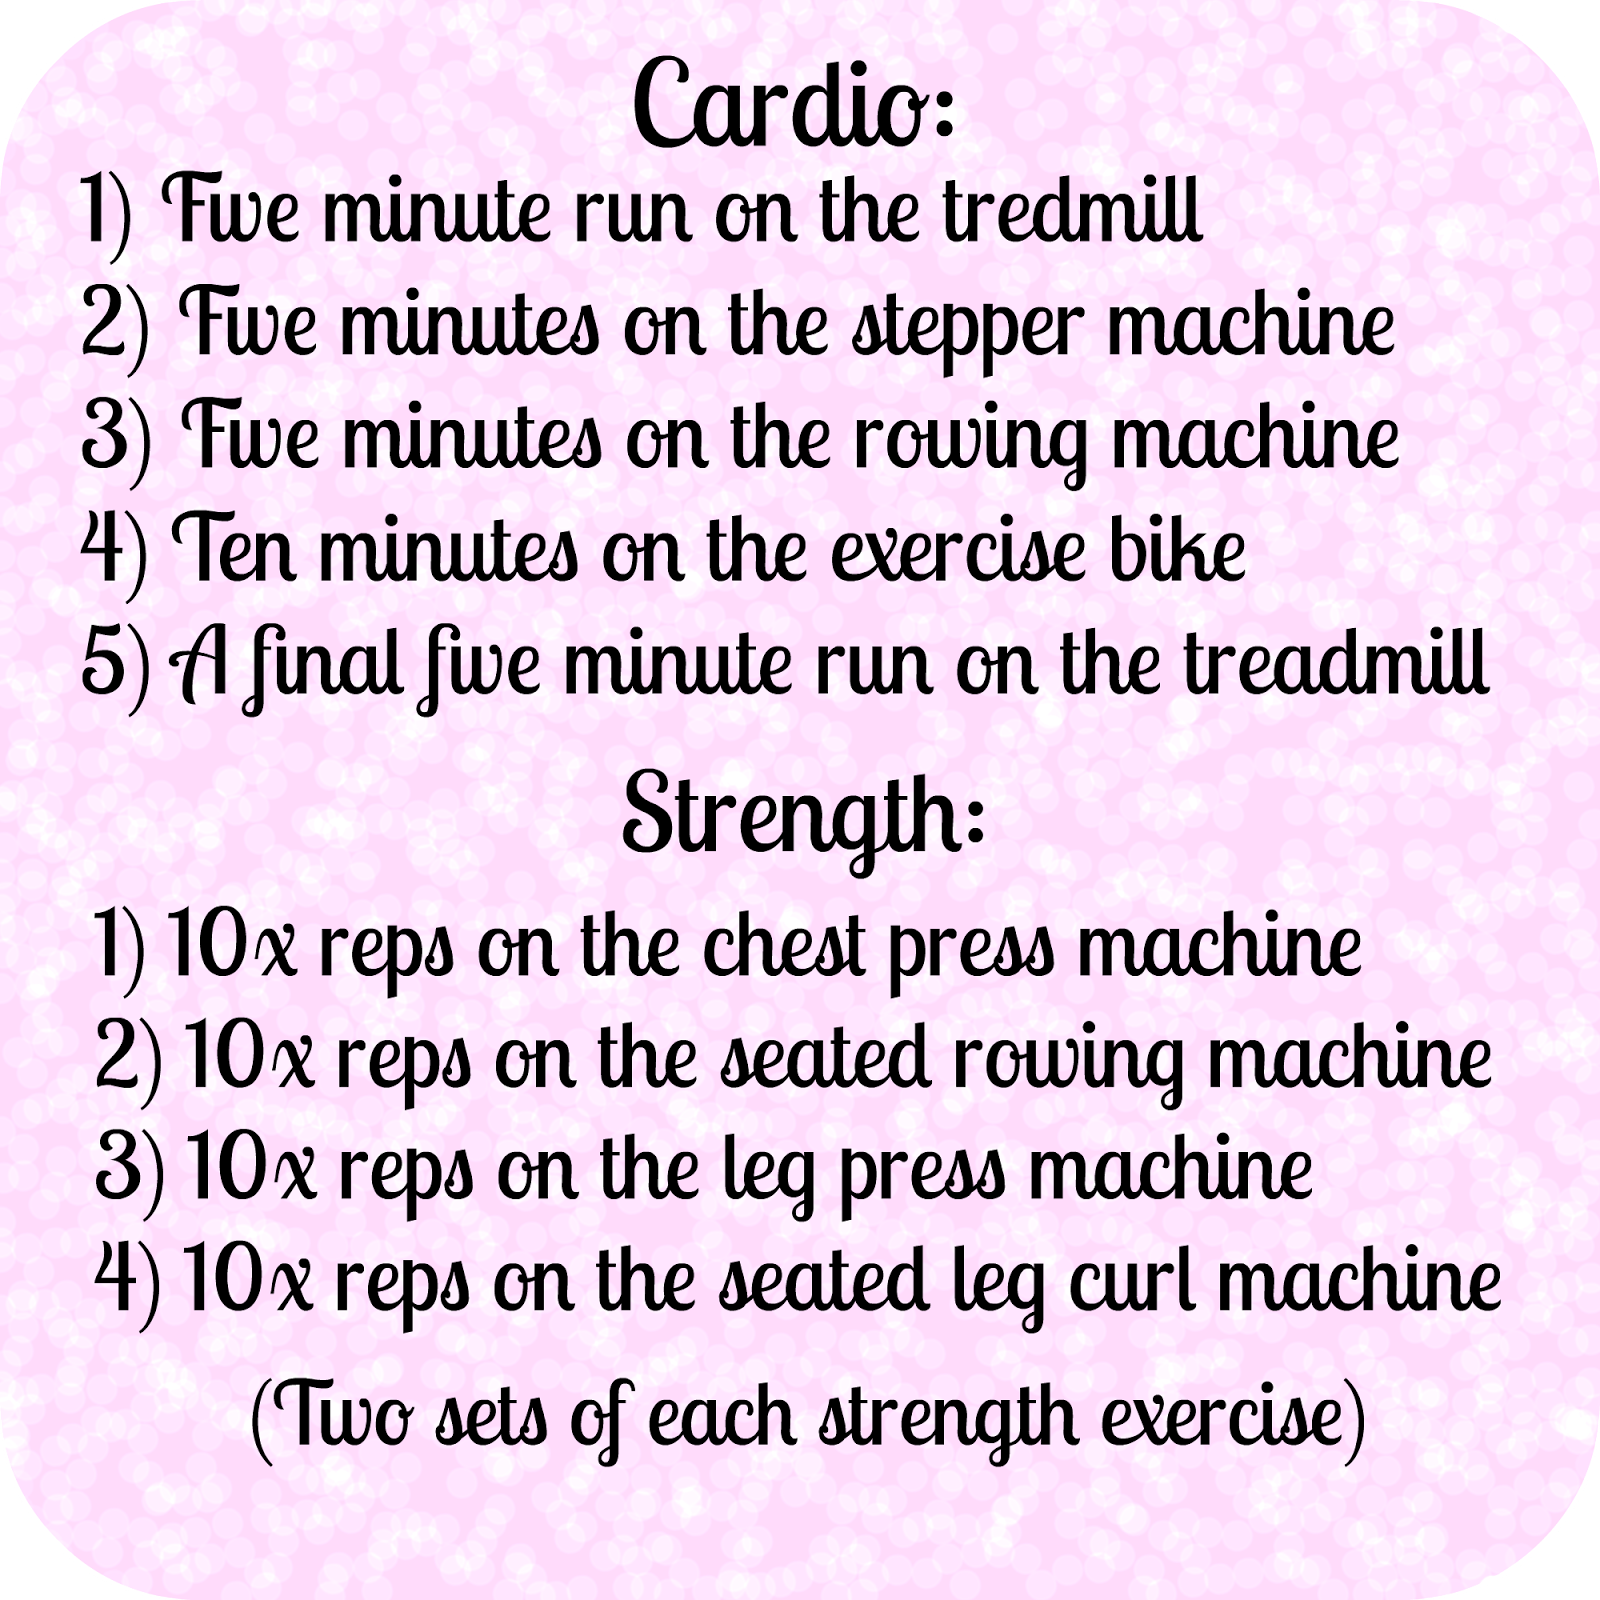
However I recently realised that I didn't really have much of a routine & I just floated from machine to machine hoping I'd wake up one day weighing less & resembling a toned goddess. Due to this I decided to do a little research & have put together workout routine that I personally feel works well for me.

I thought this would be perfect to share with anyone who may - like me - be a bit of a loss with what to actually do once you've actually managed to get build the motivation to get to the gym (which in itself is a huge achievement in my opinion).  


Admittedly I don't stick to this routine religiously.. for example if my back is feeling a little sore from my previous work out I may skip the rowing machine and spend a little longer on the stepper... Or other days I may decided to attend a class instead..  I know, I know.. I'm wild!


What are your favourite exercises/routines?
I'd love to hear any tips anyone has!
xxx

Sunday, 22 March 2015

Evening Skincare Routine

One of the things I love about reading blog posts is picking up on hints and tips from others. Whether it's a review on a product that I've had my eye on for a while or reading about a way of doing things that I simply hadn't thought about before.

So whilst taking off my make-up a few days back -  I thought why not put together a little "evening skincare routine"? It would be the perfect way to put together a few product reviews along with an in-sight into my little routine.

My evening skin care routine is nothing particularly fancy, doesn't take that long & only contains 3 steps... however I find it's the perfect way to remove my make-up (including stubborn mascara) & leaves my skin feeling perfectly clean.


Step One: 
To help start to take off my make-up I massage Nivea's Daily Essentials Sensitve Cleansing Milk into dry skin & after a few minuets rise off with warm water. I find this helps remove the bulk of my make-up & prepare my skin for using my favourite cleanser.
Now this isn't a product that I would use on it's own - but I find it works perfectly to start breaking down & removing make-up. 

Step Two: 
I then use my Liz Earle Hot Cloth Cleanser by gently massaging it into my damp skin. I always make sure to take extra time to massage this over my eye-lashes as I hate waking up to find random smudges of mascara under my eyes.
I then take the Liz Earle Muslin Cloth, run it under warm water & use it remove any excess make-up. 
I instantly fell in love with this cleanser from the first use. I honestly find it's the only product that really removes my make-up & leaves my skin feeling properly clean. 

Step Three: 
Finally I gently pour a generous amount of the Liz Earle Instant Boost Skin Tonic onto cotton wool pad, and sweep across skin. This removes any bits of make-up or dirt that may be straggling behind as well as adding moisturiser to leave skin feeling beautifully soft. Bonus.. This product also smells gorgeous!

& there we have it - clean & make-up free skin!

Although the Liz Earle products are a little more on the pricey side (with the cleanser retailing at around £14.00 for a 100ml pump & the toner retailing at £14.50 for a 200ml bottle) they really are 100% worth the extra pennies. I'd much rather pay a little more & know my skin is being properly cleaned, then purchase a cheaper product & have make-up/day-day dirt left behind. 

If you're interested in trying out any of the Liz Earle products - but aren't sure about spending the higher prices only to find it's not a product for you, miniature products can be purchased online. These are the products featured in the above photos. 

The "Hot Cloth Cleanser Starter Pack" can be bought for £6.00. This includes a 30ml tube of cleanser and a Muslin cloth.  In addition to this, a 50ml bottle of the Instant Boost Skin Tonic can be purchased for £6.00. The website states that this is enough product to last one week - however I think this is a massive understatement. With daily use I found this lasted me around 3 weeks, as you really do only need a large pea sized amount. 

Follow the links below to view each of the above products online:
Nivea Cleansing Milk x
Hot Cloth Cleanser x
Instant Boost Skin Tonic

After going through many different products, I think I've finally found the perfect evening skin care routine for me. I truly believe this is the best combination of products to leave my skin clean & moisturised. I also can't wait to try other products in the Liz Earle range. 


What's your favourite "evening routine" product?

xxx

Sunday, 7 September 2014

Face Of The Day - Lazy Sunday Make-up

Whilst I was getting ready this morning *well I say this morning but it was really around midday, oops lazy* I decided to turn my little routine into a new blog post. 

This is the first time I've written anything like this so forgive me, it may not be perfect. But I personally love reading about people's make-up routines, so thought I would share one of mine along with showing  some of the different products I'm currently using. 

I'd say this routine is the base of my every-day look, then depending on my mood, time or the days activities, I'll either glam it up, or tone it down - think bright lipsticks for a night out and just a touch of concealer if a friend's coming over. 

This Sunday afternoon consisted of a wander into town so - as the title suggests - I opted for a lazy/natural make-up look.

Step 1: 


 How adorable!


So... First things first.. I grab one of my make-up bags. I usually keep my day-day bits and pieces in this bag, then other make-up bits in a bigger bag. I purchased this about a week ago from Primark and it was only £2.. Absolute bargain, plus it fits nicely into my hand-bag.


Step 2 - Face:


I really couldn't be bothered with a primer this morning, so opted to go straight for foundation. I am currently using the Max Factor "Whipped Creme Foundation" in the shade 40 (Light Ivory) *Super pale I know*.

I am loving this Foundation as I find it blends so well whilst providing lovely coverage - it also smells nice, bonus! I've been dying to try this Foundation since I received a sample a few months back, so when my old foundation started to come to an end, I finally decided to give it a go.

To blend this, I use the Real Techniques Stippling Brush - I know it needs a clean.. oops - To find out more about this, read my review post here *Spoiler - I love it*.


Once I've finished, I use a pressed powder to ensure my foundation is completely set and then stays in place throughout the day. I also use this product if I've been rushing around - e.g. a mad dash to work - to reduce any shine and signs of a sweaty face *beautiful*.

 I use a powder brush - yes I know this also needs a clean, don't judge me - which I believe is from Boots.. Maybe no.7? I've had this for so long now I can't really remember - sorry!

But back to the powder -  I'm using the pressed powder by MUA (aka Make-up Academy), which I bought a while back when I was a poor student for the absolute bargain of £1!

Now I didn't have the highest of expectations when I made this purchase, but I have to say I've been pleasantly surprised. As you can probably tell from the photo, I have used this loads - everyday to be precise -  and continue to be very happy with it.

This powder is very fine and provides a lovely matte finish to my skin. I personally have very dry skin but do not find this drying at all.

Unfortunately I've used this so much that the writing has pretty much vanished, but being so pale, I probably have this in shade 1 - maybe 2 at a push haha.

Obviously this powder may not be as effective as some other brands, but for £1 you really can't go wrong.

If you're interested in this powder, click here to be taken to the MUA website, or you can purchase it in Superdrug (and UK students can get that 10% off with those NUS cards).


The next step for today's make-up look is bronzer.
In my opinion bronzer is a saint of the make-up world. It works absolute wonders!

My current bronzer favourite comes from the Sleek Face Form contouring kit. As you can see from the photo, the compact comes in a set of 3 - a bronzer, blusher and highlighter.

For my lazy make-up look I simply used the bronzer, along with my fluffy cheek brush and apply the bronzer over my cheekbones up to brown bones (as if I was doing a full contour), dust a little on my forehead and finally some more along the sides of my jaw line.

The cheek brush I have used here is by a brand called Front Cover. I think it came from Boots - although it was a Christmas gift so I'm not 100% sure. Boots don't seem to have a link on their website so click here to go to the Front Cover site and maybe have a nose around. It's so soft and fluffy and does an excellent job of applying powdered make-up.

After this I blend the bronzer with my big powder brush to ensure I'm not streaky - not a good look!

Again, if you're interested in Sleek's contouring kit you can find it here on the Sleek website, or at Superdrug - which is where I personally purchased it from. Although my local Tesco also has a Sleek make-up counter *just a little head-up if you struggle to find it*.

This is also very affordable at only £9.99 and I personally love it. This kit is a staple in my make-up routine and I honestly don't think I could go without out it now!

Step 3 - Eyes: 


I kept it very simple today with just a few coats of Rimmel's Volume Flash x 10 Extreme Black mascara. Now I'm not too sure if this really gives my eyelashed 10x volume "in a flash" as the packaging and adverts state.

However, this is still a great mascara for the price and does lengthen my lashes along with creating a slightly more dramatic look. I've only used this product for day time wear so far, so admittedly haven't tried any look that is too dramatic - I feel my boss would have a slight fit if I walked into the office with a full on dramatic smokey eye look - but for my next night out, I may give it a go!

The only issue with this product - and I aim to be completely honest when writing about products - is that it can be a little clumpy at time. Clumpy eye-lashes are a pet hate of mine, so as soon as I notice it I'll do anything I can to un-clump.

Don't fear though - this issue can be easily fixed either with a clean mascara spoolie or an eyelash comb, which every you prefer. Personally I use an old mascara wand, which has been cleaned, and then just quickly run it through my lashes before the mascara dries... Clumpy eyelashes banished! *cheers happily*

This retails at around the £6.00 mark, so is very affordable and can be purchased from the Rimmel website here or from Superdrug *can you see a pattern forming here? Haha*.

Step 4 - Eyebrows: 

As most people know, eye-brows are such an important feature of the face. It's crazy the amount of power two little lines of hair can have! Therefore I like to make sure my eyebrows are nicely filled.

I tend to go back and forth between using powder with an eyebrow brush and an eyebrow pencil to fill in my eyebrows (don't think I could have said "eyebrow" any more throughout that sentence). For this lazy look though, I opted for the pencil.

I start by combing over my eyebrows with the little brush on the lid, then run over my eyebrows with the pencil in short, light strokes.

As my eyebrows are naturally darker then my hair (but I don't want them to look too dark as it just doesn't look right on me - think caterpillars) I find this technique helps to ensure they stay looking natural, yet in shape.

After this I quickly run back over the top of my eyebrows just to ensure any loose flakes from the pencil are removed and everything is perfectly blended.

The pencil I currently use is the Rimmel Professional Eyebrow Pencil, in the shade Hazel, which is very purse friendly at just £2.99. You can view this product here on the Rimmel website or - of course - purchase it from Superdrug.


Step 5 - lips: 

There really wasn't a whole lot of effort put into my lip make-up today. But once everything else had been finished I applied a layer of The Body Shop's Born Lippy lip balm in the flavour Strawberry.

According to the website the Born Lippy lip balm range provides a slight lip tint. Now I don't have any of the other shades yet, but I wouldn't say this  provides any tint at all. However, I didn't want a balm that provided any colour, so I feel this is perfect for those days when you want a natural make-up look, but still have a little something on your lips.

The balm is also lovely and moisturising - without having that horrible sticky feeling to it - and adds a ever so slight shine to the lips. 

In addition to this, one of my favourite things about this product is the packaging -  which is a fun pop-art themed!

The only slight downside comes from the fragrance, which is a little on the "fake-strawberry" side. To be fair though this isn't over powering in the way that some Strawberry scented products are, and this isn't a scent that lingers around. 

I love this product and usually carry this around in my handbag every day! The Body Shop has a range of flavours, which include plum, pomegranate and toffee - so if Strawberry isn't your thing there are plenty of options!  

This retails for £3 which isn't too pricey and can be brought from The Body Shop website here, or in store. 


End result: 

What I believe to be a natural/lazy day make-up look!


What a poser!

xxx

*Disclaimer*

After reading back through this I mention the shop Superdrug around a million time. I promise this isn't sponsored or endorsed by the company in anyway... Apparently I just have a slight addiction with the shop. Haha!
Showing posts with label routine. Show all posts

My Current Gym Routine

You may have read my recent blog post about how I set myself the challenge of getting myself back into shape.. *looks over at the Dominos menu pinned to the fridge longingly*.

I'll be honest & say that I haven't suddenly turned into some fitness fanatic who's ready to run the London Marathon.. but there's something about dragging myself to the gym that ultimately leaves feeling pretty good about myself.. Endorphins maybe? Who knows. 

However I recently realised that I didn't really have much of a routine & I just floated from machine to machine hoping I'd wake up one day weighing less & resembling a toned goddess. Due to this I decided to do a little research & have put together workout routine that I personally feel works well for me.

I thought this would be perfect to share with anyone who may - like me - be a bit of a loss with what to actually do once you've actually managed to get build the motivation to get to the gym (which in itself is a huge achievement in my opinion).  


Admittedly I don't stick to this routine religiously.. for example if my back is feeling a little sore from my previous work out I may skip the rowing machine and spend a little longer on the stepper... Or other days I may decided to attend a class instead..  I know, I know.. I'm wild!


What are your favourite exercises/routines?
I'd love to hear any tips anyone has!
xxx

Evening Skincare Routine

One of the things I love about reading blog posts is picking up on hints and tips from others. Whether it's a review on a product that I've had my eye on for a while or reading about a way of doing things that I simply hadn't thought about before.

So whilst taking off my make-up a few days back -  I thought why not put together a little "evening skincare routine"? It would be the perfect way to put together a few product reviews along with an in-sight into my little routine.

My evening skin care routine is nothing particularly fancy, doesn't take that long & only contains 3 steps... however I find it's the perfect way to remove my make-up (including stubborn mascara) & leaves my skin feeling perfectly clean.


Step One: 
To help start to take off my make-up I massage Nivea's Daily Essentials Sensitve Cleansing Milk into dry skin & after a few minuets rise off with warm water. I find this helps remove the bulk of my make-up & prepare my skin for using my favourite cleanser.
Now this isn't a product that I would use on it's own - but I find it works perfectly to start breaking down & removing make-up. 

Step Two: 
I then use my Liz Earle Hot Cloth Cleanser by gently massaging it into my damp skin. I always make sure to take extra time to massage this over my eye-lashes as I hate waking up to find random smudges of mascara under my eyes.
I then take the Liz Earle Muslin Cloth, run it under warm water & use it remove any excess make-up. 
I instantly fell in love with this cleanser from the first use. I honestly find it's the only product that really removes my make-up & leaves my skin feeling properly clean. 

Step Three: 
Finally I gently pour a generous amount of the Liz Earle Instant Boost Skin Tonic onto cotton wool pad, and sweep across skin. This removes any bits of make-up or dirt that may be straggling behind as well as adding moisturiser to leave skin feeling beautifully soft. Bonus.. This product also smells gorgeous!

& there we have it - clean & make-up free skin!

Although the Liz Earle products are a little more on the pricey side (with the cleanser retailing at around £14.00 for a 100ml pump & the toner retailing at £14.50 for a 200ml bottle) they really are 100% worth the extra pennies. I'd much rather pay a little more & know my skin is being properly cleaned, then purchase a cheaper product & have make-up/day-day dirt left behind. 

If you're interested in trying out any of the Liz Earle products - but aren't sure about spending the higher prices only to find it's not a product for you, miniature products can be purchased online. These are the products featured in the above photos. 

The "Hot Cloth Cleanser Starter Pack" can be bought for £6.00. This includes a 30ml tube of cleanser and a Muslin cloth.  In addition to this, a 50ml bottle of the Instant Boost Skin Tonic can be purchased for £6.00. The website states that this is enough product to last one week - however I think this is a massive understatement. With daily use I found this lasted me around 3 weeks, as you really do only need a large pea sized amount. 

Follow the links below to view each of the above products online:
Nivea Cleansing Milk x
Hot Cloth Cleanser x
Instant Boost Skin Tonic

After going through many different products, I think I've finally found the perfect evening skin care routine for me. I truly believe this is the best combination of products to leave my skin clean & moisturised. I also can't wait to try other products in the Liz Earle range. 


What's your favourite "evening routine" product?

xxx

Face Of The Day - Lazy Sunday Make-up

Whilst I was getting ready this morning *well I say this morning but it was really around midday, oops lazy* I decided to turn my little routine into a new blog post. 

This is the first time I've written anything like this so forgive me, it may not be perfect. But I personally love reading about people's make-up routines, so thought I would share one of mine along with showing  some of the different products I'm currently using. 

I'd say this routine is the base of my every-day look, then depending on my mood, time or the days activities, I'll either glam it up, or tone it down - think bright lipsticks for a night out and just a touch of concealer if a friend's coming over. 

This Sunday afternoon consisted of a wander into town so - as the title suggests - I opted for a lazy/natural make-up look.

Step 1: 


 How adorable!


So... First things first.. I grab one of my make-up bags. I usually keep my day-day bits and pieces in this bag, then other make-up bits in a bigger bag. I purchased this about a week ago from Primark and it was only £2.. Absolute bargain, plus it fits nicely into my hand-bag.


Step 2 - Face:


I really couldn't be bothered with a primer this morning, so opted to go straight for foundation. I am currently using the Max Factor "Whipped Creme Foundation" in the shade 40 (Light Ivory) *Super pale I know*.

I am loving this Foundation as I find it blends so well whilst providing lovely coverage - it also smells nice, bonus! I've been dying to try this Foundation since I received a sample a few months back, so when my old foundation started to come to an end, I finally decided to give it a go.

To blend this, I use the Real Techniques Stippling Brush - I know it needs a clean.. oops - To find out more about this, read my review post here *Spoiler - I love it*.


Once I've finished, I use a pressed powder to ensure my foundation is completely set and then stays in place throughout the day. I also use this product if I've been rushing around - e.g. a mad dash to work - to reduce any shine and signs of a sweaty face *beautiful*.

 I use a powder brush - yes I know this also needs a clean, don't judge me - which I believe is from Boots.. Maybe no.7? I've had this for so long now I can't really remember - sorry!

But back to the powder -  I'm using the pressed powder by MUA (aka Make-up Academy), which I bought a while back when I was a poor student for the absolute bargain of £1!

Now I didn't have the highest of expectations when I made this purchase, but I have to say I've been pleasantly surprised. As you can probably tell from the photo, I have used this loads - everyday to be precise -  and continue to be very happy with it.

This powder is very fine and provides a lovely matte finish to my skin. I personally have very dry skin but do not find this drying at all.

Unfortunately I've used this so much that the writing has pretty much vanished, but being so pale, I probably have this in shade 1 - maybe 2 at a push haha.

Obviously this powder may not be as effective as some other brands, but for £1 you really can't go wrong.

If you're interested in this powder, click here to be taken to the MUA website, or you can purchase it in Superdrug (and UK students can get that 10% off with those NUS cards).


The next step for today's make-up look is bronzer.
In my opinion bronzer is a saint of the make-up world. It works absolute wonders!

My current bronzer favourite comes from the Sleek Face Form contouring kit. As you can see from the photo, the compact comes in a set of 3 - a bronzer, blusher and highlighter.

For my lazy make-up look I simply used the bronzer, along with my fluffy cheek brush and apply the bronzer over my cheekbones up to brown bones (as if I was doing a full contour), dust a little on my forehead and finally some more along the sides of my jaw line.

The cheek brush I have used here is by a brand called Front Cover. I think it came from Boots - although it was a Christmas gift so I'm not 100% sure. Boots don't seem to have a link on their website so click here to go to the Front Cover site and maybe have a nose around. It's so soft and fluffy and does an excellent job of applying powdered make-up.

After this I blend the bronzer with my big powder brush to ensure I'm not streaky - not a good look!

Again, if you're interested in Sleek's contouring kit you can find it here on the Sleek website, or at Superdrug - which is where I personally purchased it from. Although my local Tesco also has a Sleek make-up counter *just a little head-up if you struggle to find it*.

This is also very affordable at only £9.99 and I personally love it. This kit is a staple in my make-up routine and I honestly don't think I could go without out it now!

Step 3 - Eyes: 


I kept it very simple today with just a few coats of Rimmel's Volume Flash x 10 Extreme Black mascara. Now I'm not too sure if this really gives my eyelashed 10x volume "in a flash" as the packaging and adverts state.

However, this is still a great mascara for the price and does lengthen my lashes along with creating a slightly more dramatic look. I've only used this product for day time wear so far, so admittedly haven't tried any look that is too dramatic - I feel my boss would have a slight fit if I walked into the office with a full on dramatic smokey eye look - but for my next night out, I may give it a go!

The only issue with this product - and I aim to be completely honest when writing about products - is that it can be a little clumpy at time. Clumpy eye-lashes are a pet hate of mine, so as soon as I notice it I'll do anything I can to un-clump.

Don't fear though - this issue can be easily fixed either with a clean mascara spoolie or an eyelash comb, which every you prefer. Personally I use an old mascara wand, which has been cleaned, and then just quickly run it through my lashes before the mascara dries... Clumpy eyelashes banished! *cheers happily*

This retails at around the £6.00 mark, so is very affordable and can be purchased from the Rimmel website here or from Superdrug *can you see a pattern forming here? Haha*.

Step 4 - Eyebrows: 

As most people know, eye-brows are such an important feature of the face. It's crazy the amount of power two little lines of hair can have! Therefore I like to make sure my eyebrows are nicely filled.

I tend to go back and forth between using powder with an eyebrow brush and an eyebrow pencil to fill in my eyebrows (don't think I could have said "eyebrow" any more throughout that sentence). For this lazy look though, I opted for the pencil.

I start by combing over my eyebrows with the little brush on the lid, then run over my eyebrows with the pencil in short, light strokes.

As my eyebrows are naturally darker then my hair (but I don't want them to look too dark as it just doesn't look right on me - think caterpillars) I find this technique helps to ensure they stay looking natural, yet in shape.

After this I quickly run back over the top of my eyebrows just to ensure any loose flakes from the pencil are removed and everything is perfectly blended.

The pencil I currently use is the Rimmel Professional Eyebrow Pencil, in the shade Hazel, which is very purse friendly at just £2.99. You can view this product here on the Rimmel website or - of course - purchase it from Superdrug.


Step 5 - lips: 

There really wasn't a whole lot of effort put into my lip make-up today. But once everything else had been finished I applied a layer of The Body Shop's Born Lippy lip balm in the flavour Strawberry.

According to the website the Born Lippy lip balm range provides a slight lip tint. Now I don't have any of the other shades yet, but I wouldn't say this  provides any tint at all. However, I didn't want a balm that provided any colour, so I feel this is perfect for those days when you want a natural make-up look, but still have a little something on your lips.

The balm is also lovely and moisturising - without having that horrible sticky feeling to it - and adds a ever so slight shine to the lips. 

In addition to this, one of my favourite things about this product is the packaging -  which is a fun pop-art themed!

The only slight downside comes from the fragrance, which is a little on the "fake-strawberry" side. To be fair though this isn't over powering in the way that some Strawberry scented products are, and this isn't a scent that lingers around. 

I love this product and usually carry this around in my handbag every day! The Body Shop has a range of flavours, which include plum, pomegranate and toffee - so if Strawberry isn't your thing there are plenty of options!  

This retails for £3 which isn't too pricey and can be brought from The Body Shop website here, or in store. 


End result: 

What I believe to be a natural/lazy day make-up look!


What a poser!

xxx

*Disclaimer*

After reading back through this I mention the shop Superdrug around a million time. I promise this isn't sponsored or endorsed by the company in anyway... Apparently I just have a slight addiction with the shop. Haha!